![]()
![]()
![]()
![]()
![]()
![]()
Thank you for choosing the Jump Stop chain
guide. From now on, you will be able to downshift with confidence
because this guide covers the entire engagement zone with stainless
steel. Also, the inner limit adjustment on your front derailleur
need no longer be a compromise between performance and safety. After
your Jump Stop is installed, you can adjust your front derailleur for maximum
performance downshifts and let the Jump Stop make sure your chain hits
the small chainring perfectly every time. If your chain should do
a reverse derailment (a whiplash derailment starting at the bottom) the
Jump Stop is designed to catch the chain at the top and hold it in contact
with the small chainring. In most cases, simply pedalling forward
will thread the chain back on. Note: The Jump Stop is
not
for the sort of chain suck where the chain fails to disengage at the bottom
and wedges up between the chainring and frame. There are other products
to address that problem. However, chain snarls and jams which are
a direct result of derailment (eg. BB wedgies and knobby suckdown) are,
of course, eliminated along with the derailment problem.
Fit: The Jump Stop will fit most, but not all, derailleur bicycles. It mounts on the same frame member as the front derailleur, directly below it. The Jump Stop needs to have about 3/4 of an inch (18 mm) of tube length free of obstructions and the frame member needs to be in one of three diameters: 1-1/8, 1-1/4, or 1-3/8 inches. (approx. 29, 32, or 35 mm). Please make sure the size marked on the header tag matches the outside diameter of the frame member below your front derailleur. The Jump Stop is not recommended for strongly ovalized tubes if it cannot be mounted above the oval tube section. For best results, the inner chainring should have less than 5/32 inch (4 mm) total side-to-side movement at the top (e.g. due to bearing play, ring warpage, or crank flex). However, your chainrings do not have to be round. |
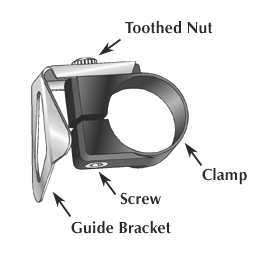
The Parts of the Jump
Stop
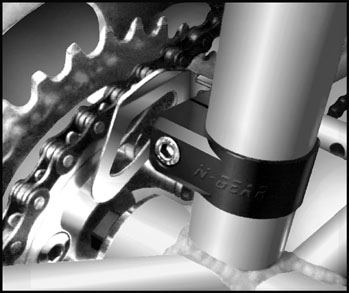
Installation: 1) Clean the frame tube
below the front derailleur. Wrap the clamp around this tube at the
same height as the top of the smallest chainring. If installing in
cold weather, it is recommended you run hot tap water over the clamp first.
(Do not use flame to warm the clamp.) Avoid clamping any control
cables or speedometer wires against the frame. The N-GEAR?mark
should be right side up, and the ends should almost meet on the chainring
side of the seat tube.
CAUTION The mounting clamp is fiber reinforced. While this provides added strength, it does reduce flexibility somewhat. Avoid flexing the clamp backwards, twisting the clamp, or bending it sharply as this will only break fibers unnecessarily. 2) From the front, fully insert the screw through both ends of the clamp. 3) Install the guide bracket on the rear of the clamp. A few screw threads should protrude through the slotted arm on the guide bracket and the ramped guide face should be running forward alongside the chainring. 4) Secure the guide bracket to the clamp by threading the toothed nut onto the end of the screw. The locking tooth should fall into the slot on the guide bracket. (If you find the tooth is limiting your side-to-side adjustment, rotate the nut a half-turn so it points away from the closest end of the slot.) Adjustment: 1) Shift the chain to the smallest chainring and largest freewheel cog. Slide the clamp up or down the frame tube until the chain link pins run between the two tracks shown below. The Jump Stop handles reverse derailments better toward the upper track, but is fully effective against forward (normal) derailments throughout this range. |
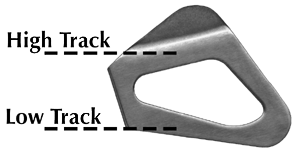
Upper and Lower Tracking
Limits for
Chain Link Pins
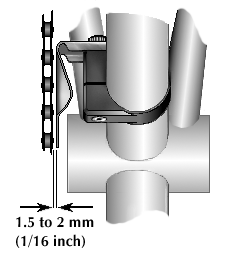
2) Slide the bracket left or right until there
is a 1.5 to 2 millimeter gap (the thickness of a penny and a nickel respectively)
between the chain at its closest point and the front of the guide bracket.
This gap is primarily for handling reverse derailments, so it can be less
if this is not a consideration. Also, the gap may be smaller toward
the rear of the guide so long as the chain does not rub during pedalling. |
3) Secure the bracket in place by tightening the
screw with a 4 mm or 5/32 in. hex key (included). Once the screw
is tight enough the bracket won't slide from side to side, the clamp will
be secure. Additional tightness is unnecessary. Give the crank
a spin to make sure the chain does not rub against the guide. (Recheck
this clearance whenever you service the right crankarm.) That concludes
installation and adjustment. It is now safe to loosen the inner-limit
set screw of your front derailleur for maximum performance downshifts.
If you are unsure how to make this adjustment, consult your favorite bike
shop. |
No-Hassle Warranty:
The Jump Stop is meant to be a permanent fix for suicide downshifts.
If any part of your Jump Stop failsfor any reasonjust tell me what replacement
part you need and where to send it. (Remember to specify the size
if you need the clamp.) If you have questions or problems, I can
usually be reached at:
ngear@gvtc.com (800) 659-4607 or (830) 755-4607 N-Gear 303 Whitworth Rd. Boerne, TX 78006-8559 Nick |